Why Circuit Board Pen Blanks
Not long ago, a large wood turning supplies vendor was offering circuit board pen blanks at clearance prices and I decided to spring for a few of these. My husband is a “techie,” having made a living as a technology executive and sales consultant for years and he still maintains an active knowledge base and daily application of technology in our lives. And, I figured that I would identify others who might have a similar interest or background. Besides, I didn’t see the point in paying shipping for just one blank!
My Past Experience
I had worked with these blanks before, years ago, as well as others constructed in a similar manner. So, I knew that these blanks, consisting of a large amount of sticky and brittle acrylic surrounding the core of the blank that features the circuit board parts, can be, to put it politely, challenging to work with. Simply put, the acrylic shatters easily, especially along the corners.
Circuit Board Pens
Innovative Solution to a Problem
Equally long ago, I discovered a workable solution to this tendency to shatter. In a word: sandpaper. To start the turning process successfully and to avoid any risk of shattering, I simply use strips of 80 grit sandpaper torn off of a large sheet to round down the edges. It might sound like this would be tedious and time consuming, but in reality the acrylic sands down quite quickly with 80 grit paper.
Easy Wood Tools
I suppose, for sake of argument, that one could just sand the blank down to the desired size using nothing but sandpaper, but where is the turning fun in that! So, once I had the corners rounded off, I returned to more traditional turning practices. I used my Easy Wood Tools small size Easy Rougher, which is also sold as an Easy Pen Turner (the two tools are identical except maybe the handle). There are three different carbide cutters one can choose from to fit this tool: 2″ and 4″ radius and a square cut. I have both the 2″ radius and the square cut, but I almost always use the 20 degree sweep as it makes it easier for me to achieve the sloped design that is larger in the center for a better hand feel and grip, especially for larger male hands such as mine.
The sandpaper will leave the material heavily hazed and scratched, but this is easily removed with the fine shaving action of the Easy Rougher/Easy Pen Turner. The carbide shaves away the acrylic easily and quickly. It is still necessary to sand and polish the blank after turning. If you have achieved a decent cut with the tool, then there should be no need to start with anything higher than 320 grit paper and this is usually where I start. Even that tends to produce a rougher surface than what I achieve with the Easy Tool but it helps to smooth out any possible roughness, should there be any. I then move through 400, 600, and 800 grits.
Final Sanding and Polishing
800 grit marks the end of “traditional” sandpaper, so I move on to the Micro Surface Pen Finishing Kit which features nine foam pads with very fine grit sandpaper on both sides of the pads. The grits start at 1,500 and progress down to 12,000. These pads are specially designed for fine polishing acrylic and stabilized pen blanks and they perform like a miracle. The acrylic will likely be slightly hazy, even after the 800 paper, but don’t despair. As you work through the nine fine grits, the acrylic will become clearer and clearer until it looks like glass.
I still put a polish on the blank even after all the micro-fine sanding. For that I prefer to use Craftics 20/20 Plasti-Polish. This milky liquid polish contains very fine micro-abrasives to put an incredible shine and finish on all acrylic or stabilized materials. I have used it successfully for years and trust it completely for the final step with all of my acrylic, stabilized, and TruStone creations.
Final Thoughts on the Matter
Once you know about the trick of sanding down the corners to reduce, or even prevent, the risk of shattering, any wood turner with even a small amount of experience should be easily successful with circuit board pen blanks, or others of similar design. The sanding trick may not be “traditional,” but in my book that which works to help you achieve the desired result, provided it harms no one and isn’t illegal, is the way to go.
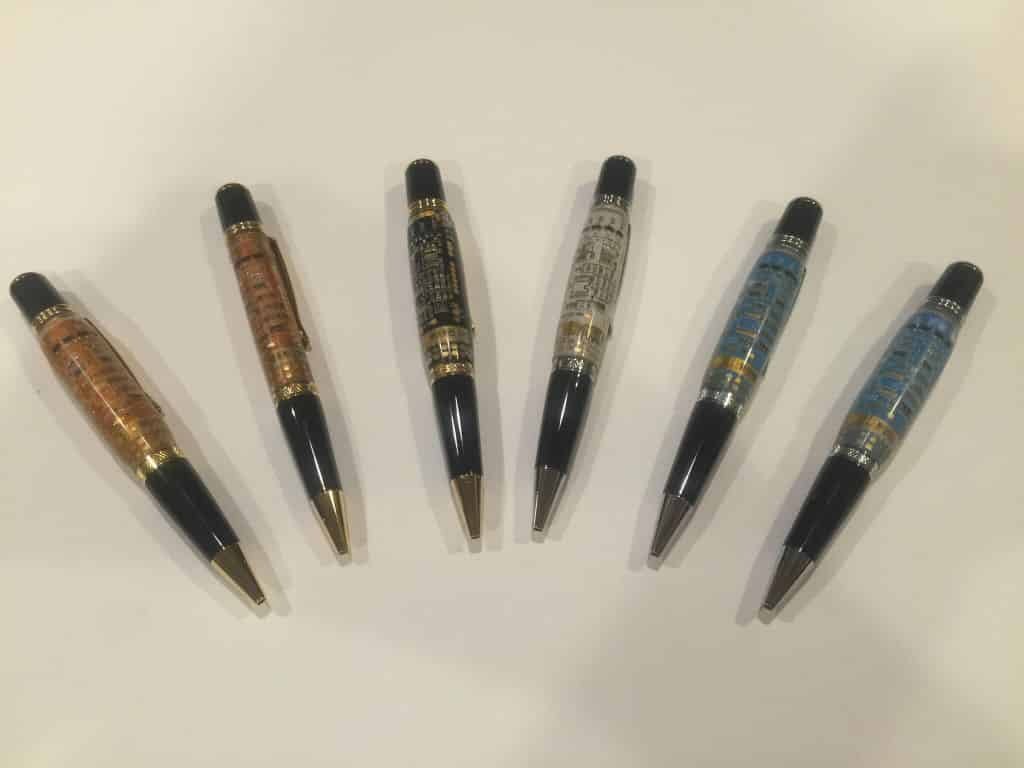
The Destinations of the Finished Pens
I sent one of these pens on to my first-cousin-once-removed who just graduated from high school and this pen should gain him some attention in his college classes, especially given the orange color. I gave another one, the white one, to my husband to use at his desk. I confess that I was so impressed with the heft and comfortable feel of the pens that I kept two, one black and one blue, for my own personal use. I require thick pens because neuropathy and cervical disc compressions cause my writing hand to be relatively weak and easily fatigued. These circuit board pens have proven comfortable, even for long periods of writing, and I always on the hunt for pens exactly like these. There really is nothing like making exactly what works best for you!
The final two I sent to my older sister, for whom I have a good deal of “hero worship,” to give as gifts to a couple of her favorite Information Technology staff. Because I bought the blanks at a good price, and because I like do things that might make my sister happy, I gave them to her gratis. All told great results for a relatively small investment of time and effort.
As always, I wish all my readers a great experience in whatever their wood working interests happen to be and to those who like working with lathes especially, do a good turn today!