Introduction and Rationale
In a previous post, I wrote about many of the general characteristics of working with Corian as a pen making material. That post came about as a result of a project in which I decided to make a batch of 36 pens using Corian blanks and Slimline pen kits from two vendors: Woodcraft and Craft Supply USA. The kits were essentially identical, although there was an extremely slight difference in the length of the brass tubes. This difference had no effect in the assembly of the pens however as the blanks were mixed by accident although I had kept the blanks for each manufacturer separate initially. So goes one of the risks of a shared shop space. My motive in making this batch of pens was simply to use the kits. I had purchased them years before and as I had the kits and I had the Corian I went with it. I don’t have any more Slimline pen kits but I still have a great deal of Corian, so mission partially accomplished. In what will be a series of 9 consecutive posts, I intend to discuss in detail each discrete step in the process of making this batch of Corian pens. I hope you enjoy this in-depth look at the pen making process in general, and the use of Corian as a material in specific.
Measuring the Size of Blank Required
The very first thing a pen maker must do, provided of course that you have selected a kit you wish to use and have selected the material you wish to use, is to cut the blank, or blanks, to the required size. The size and number of the blanks required will vary depending on the pen kit you are using, but in general, most pens require either one blank or two blanks cut from the same starting material, or you could mix and match I suppose if you wanted to be quite creative. Sometimes the instructions provided with the pen kits will specify the length of the blanks required, which might be the same or might be different, again depending on the design of the kit you are using, but more often you simply use the brass tube inserts provided with the kit to determine the required length. In the case of the Slimline pen kits, there are two brass tubes, of equal length, so two blanks will be required. Most standard dimension commercial pen blanks will contain more than enough material to cut both blanks from one starting piece. Sometimes I use pen blanks that I have salvaged from other processes, such as rounding out bowl blanks, and those pieces are often not long enough to cut more than one blank, but in the case of the Corian blanks, one full size blank, as purchased, was more than enough to cut two Slimline sized turning blanks.
The full sized Corian blank, as purchased, measures 5 3/16 inches long. The required size of the two turning blanks to be cut from this blank each measure 2 1/16 inches long. Upon cutting both turning blanks to size, you should be left with a discard piece about 1 1/16 inches in length. Sadly, these pieces are not readily useful, although in the previous post I talked about some remote possibilities. In reality, these discard pieces are unlikely to be exactly the stated length, because it is necessary to cut the turning blanks pieces slightly longer than required to account for the milling procedure later in the process. I use the brass tubes laid on top or, or alongside, the blank to measure the cut points on one blank, then I set the fence on my bandsaw and use that standard setting to make all the cuts. I allow for about 1/16 to 1/8 inch of extra material on each end, in general.

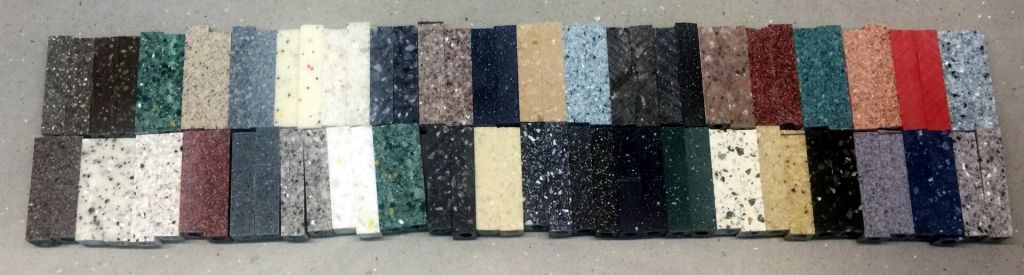
Full Blank, Two Cut to Size, and Waste
Methods of Cutting Blanks
Obviously, in order to cut the blanks to size, some type of cutting instrument, tool, or machine is required. I suppose a pen maker could use a handsaw, even a miter saw in a box if that was all that was to hand. I would imagine it to be tedious, especially when working with such small material, but I do recall mitering a great many pieces of small ¼ inch half-round molding once upon a time, including pieces less than 1 inch in length, so it would be possible. Alternatively, one could use a table saw or even a circular saw (the thought terrifies me) to cut the blanks. But, to my knowledge, most every pen maker uses a bandsaw to cut pen blanks to length because the bandsaw, with a bit of knowledge, practice and experience, is quick and easy to use, and is arguably the safest means of working with such small material, unless using a hand-powered device.
My Original Humble Bandsaw
My original bandsaw was a small tabletop sized affair that was honestly quite pathetic. It was purchased from Home Depot, which sells a great many crappy tools cheaply and you invariably get exactly what you paid for. I can’t find the exact same model, and prices seem to have risen dramatically, but suffice it to say that while the machine could usually cut a pen blank, it was absolutely beyond useless when cutting a bowl blank, and since I also make a fair number of bowls, I had to upgrade. To be fair, I suppose if ALL you want to cut is pen blanks then perhaps a benchtop bandsaw for about $100 at a big box store will be all you need, but don’t expect it to do anything more than cut very small pieces of wood.
The Upgraded Bandsaw
Once I decided to upgrade, I faced a real challenge. Beyond the benchtop cheapies you almost immediately run into very expensive heavy duty machines by big name industrial tool makers that will start at over $1,000 and quickly run very much higher. I didn’t need something that would function as a re-saw machine in a small mill but I was struggling to find an in-between model. Eventually, I settled on a Grizzly bandsaw. I realize that for heavy commercial use, Grizzly is not the choice to make, but for my level of use and for what I needed a bandsaw to do (cut pen blanks and round bowl blanks) the Grizzly G0555 Ultimate 14” Bandsaw, was exactly what I needed. To enhance the abilities of this machine, I added the Grizzly H3051 6″ Extension Block Kit. The extension block kit raises the neck of the bandsaw, converting the 14” capacity machine into a 20” capacity machine. I seriously doubt that I will ever need or want to cut something of that thickness, but now I have the option, and the Extension Block sold for less than $70, so it was not a major financial investment given the range expansion it provided. The same exact items are available today. The bandsaw now sells for $555 direct from Grizzly, but at the time, I purchased mine from Amazon, sold and delivered from Grizzly, but for only $395 with free shipping via Amazon Prime. Amazon has the effect of driving prices down steeply and there may be, and perhaps should be, some ethical concerns about the effect this has on businesses, but for the difference in price I confess that I shunted my concerns aside, shame on me. Finally, I also included a mobile base, the HTC 2000 Universal Mobile Base, for the machine which allows me to easily wheel the machine around the shop for cleaning or repositioning if that should be necessary. If nothing else, it meant I didn’t have to assemble it in place!
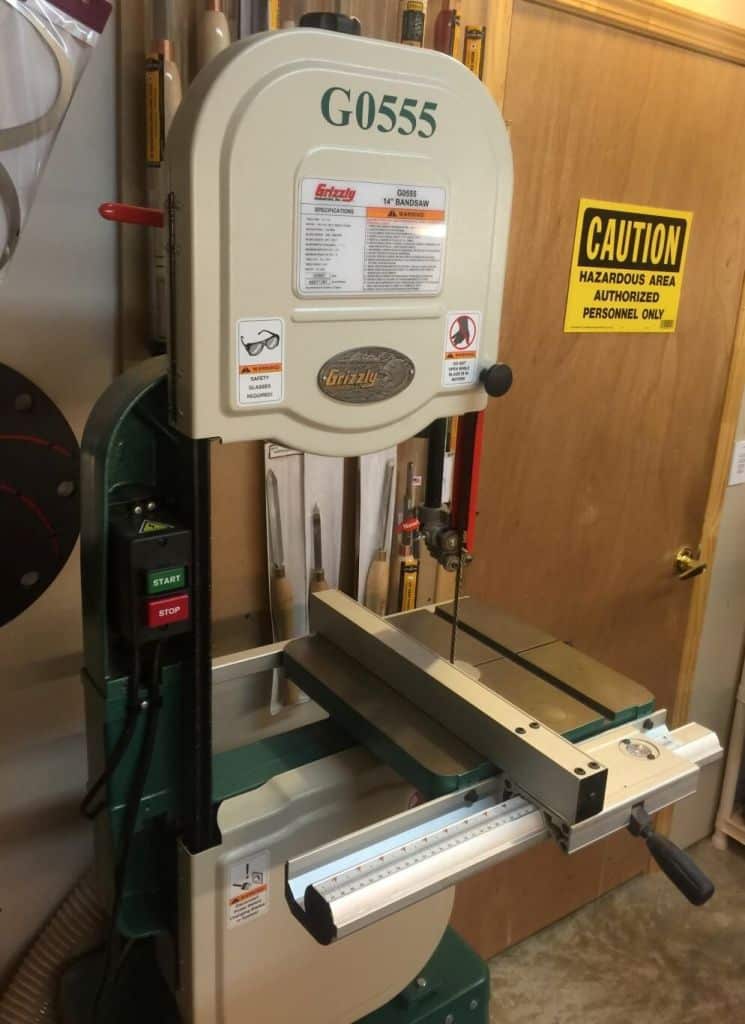
My Bandsaw
Assembly and Tensioning
Oh yes, the machine doesn’t arrive at your house assembled. You do have to put it together. That wasn’t terribly difficult, although positioning the Extension Block was the most worrisome part, but it was machined in such a way that you couldn’t do it incorrectly. The hardest part was getting the blade to run true, but that is often a challenge for most anyone until they gain a great deal of practice. The bandsaw, if you don’t already know, is a fairly simple machine. There are two fly wheels and the one on the bottom of the machine is the motor driven one. The long blade, in this case 105 inches long, is one welded piece. It is mounted through a slot in the table and looped around both fly wheels, which have rubber tires on them which hold and drive the blade momentum from the bottom driven wheel and around the top non-driven wheel. The blade must be adjusted, using knobs and springs on the back of the bandsaw to eliminate “flutter” and also properly tensioned. There are specific instructions given for this process and yes, it is frustrating the first time you have to do it. It was by far the single most difficult part of the assembly process. I had written instructions at the time from Suffolk Machinery, the manufacturers of the Timberwolf bandsaw blades, but I cannot locate them online at this time. However, others have written about this topic and I would suggest you refer to at least one of them, starting here.
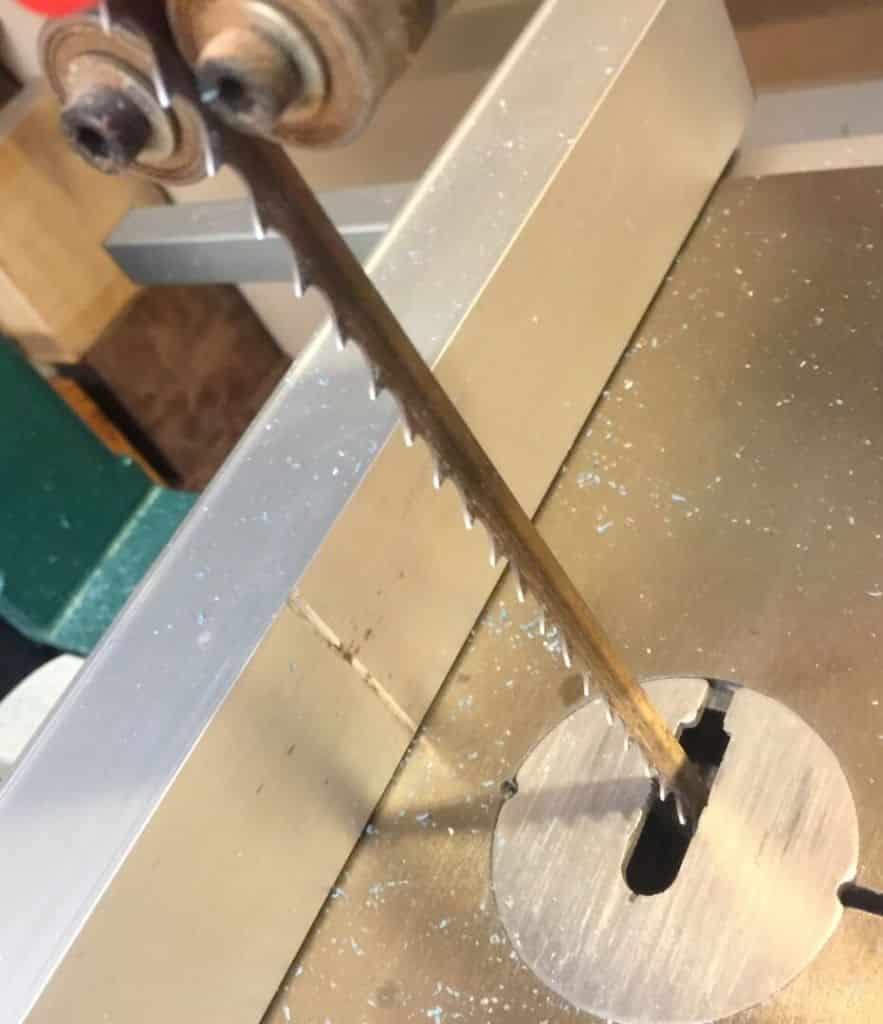
Bandsaw Blade in Position
Bandsaw Blades
The bandsaw when delivered will come with a blade but it isn’t likely to be a good one although it will get you started. On the advice of my Dad, who has decades of experience in fine cabinetry and general construction work, I sought out a blade from the experts at Suffolk Machinery. The website is updated considerably from what it was when I first looked into the company and they now include a very useful blade selection chart. At the time, I talked to a saleswoman on the phone who knew her bandsaw blades. Once she knew what two applications I wanted to put the blades to, she guided me in the selection of the appropriate blades. One blade is a 3/8″ X 3AS .032″. Hunh?? OK, if you are like me, you have no idea what that means, but now I can explain it a bit. The 3/8” refers to the width of the blade, the 3AS means that there are 3 teeth per inch in an alternate set pattern, and the .032 is the thickness of the blade. Does all of this really matter? Yep, it does. Using the right type of blade will greatly affect your results and you will be a happier and better woodturner if you use correct blades with the correct tension. Worst case scenario if you don’t is that you overstress an inappropriate blade and hurt yourself. If you don’t know how to select the best blade for the job you are attempting to do, then ask a professional, such as a telephone salesperson at Suffolk Machinery. The blade described above is the one used for roughing bowl blanks. The blade used for cutting pen blanks, the one used in making this batch of Corian pens, was a 1/2″ X 4PC .025″. This blade is of a slightly greater width but it has more teeth per inch set in a raker cut pattern and it is thinner as well. When you see the two blades next to each other, the difference is obvious.
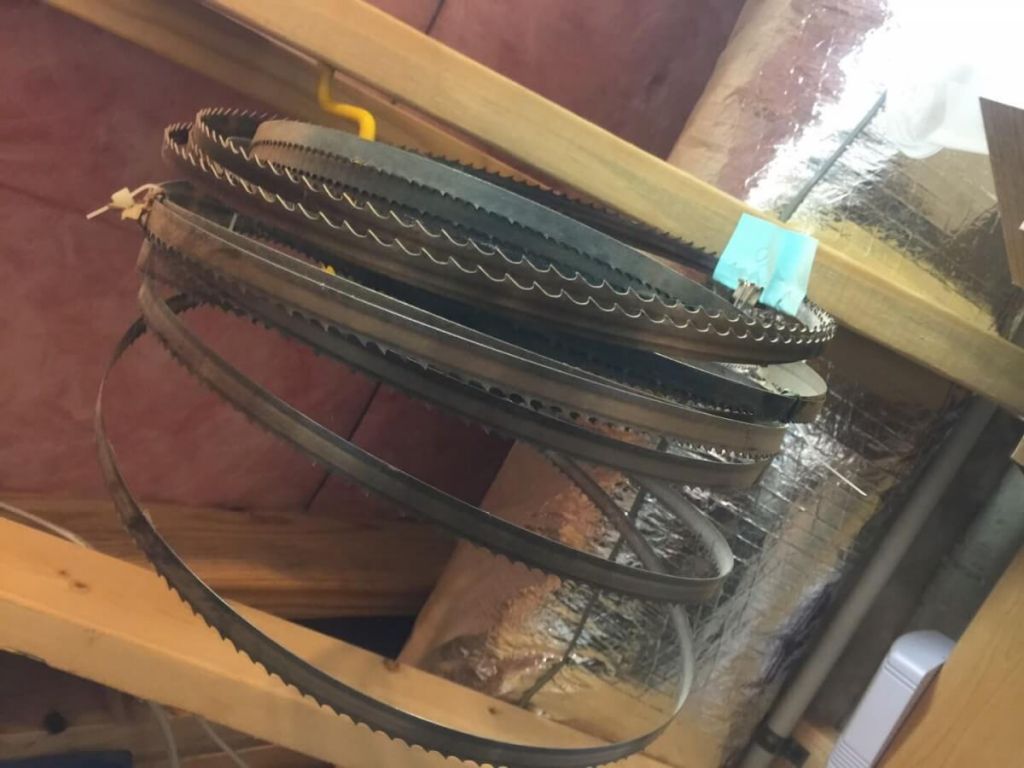
Bandsaw Blades
At some point you blade will dull depending on what you cut with it and how often you use it. I don’t know of anyone who sharpens bandsaw blades of the size we are talking about here and I don’t think it would be worth it honestly. For the highest quality blades on the market today, the Timberwolf blades, I paid around $20 each and you just won’t get them sharpened for that. When your cuts start getting ragged or slow down considerably, and you are sure that your blades are tensioned and positioned correctly, then try replacing the blades. I would always buy two blades at a time so that replacement doesn’t equal downtime. You will only know you need to replace the blade because you are actively using it. Timberwolf blades are not pre-made, they are welded on demand so it takes a few days for them to be made and then shipped to you. Planning ahead always pays off in the end.
Cutting and Blade Cleaning
Ultimately, cutting the Corian works out to be pretty much the same as cutting wood pen blanks. The Corian cuts fairly clean although if you have any gunk from cutting sappy green wood on your bandsaw blade it will rub off on your blanks. This won’t really matter anyway but I try to remove the gunk from my blades by cleaning them. I do this by dampening a cloth with acetone, which will easily dissolve sap and wax from waxed blanks, gripping the moistened part of the cloth around the blade from the BACK SIDE, AVOIDING THE TEETH IN THE PROCESS AND TURNING THE UPPER WHEEL BY HAND SLOWLY TO RUN THE BLADE THROUGH THE ACETONE MOISTENED CLOTH. Whatever you do, if you choose to clean you blades, DO NOT DO THIS WITH THE SAW TURNED ON!!! I would hope that would be obvious, but you never know. I once operated a meat cutting bandsaw and I saw a co-worker clean the blade with it running and I still have that vision in my head. Alternatively, sometimes wax can be rubbed off the blade by using a scrap piece of wood and just making repeated cuts until the debris rubs off.
Final Words
As is true of any machine, mastering a bandsaw takes a bit of practice, patience, and practice and more patience. There are lots of guides and materials on-line to help you figure it all out, but if at all possible, nothing beats the hands-on advice of a highly experienced user. Thanks Dad!
Now that our blanks are cut to size, we can proceed with the process of pen making. In the next installment of this series we will discuss drilling out the center of the blanks. Stay tuned.
Complete Set of Cut Blanks