My Initial Impressions
For years I have admired the laser cut pen blanks sold by multiple vendors, but I have been especially impressed with those manufactured and sold by Kallenshaan Woods of Las Vegas. However, as stunning and beautiful as the available designs are, I have always been too intimidated to purchase one of the kits that are sold through multiple different vendors. The process seemed complicated and the blank kits are pretty pricey, so I was afraid that a failure would be more costly than I was prepared to accept. However, I recently saw a design that I couldn’t pass up and I decided to brave the process. I sure am glad that I did.
The Winning Design
The design that I found is a horseshoe design. My older sister, whom I have admired and more or less worshiped as a hero since I was a wee one, has had a lifelong love affair with horses. She has won national championships for showing and even into her 50s she continues to ride and show horses. The horseshoe pen design seemed just perfect for her interests and no other pen blank I could conceive of would be as fitting. Because it was for her, I decided to risk it, so I bought the kit, which came complete with all the necessary pen parts and bushings.
Putting It All Together
The process starts with sliding the scuffed brass tube into the blank, in this case, a boxwood blank dyed a deep blue. The tube is loose inside the blank so it can be a bit of a challenge to keep it more or less in place, although it isn’t essential just yet that the tube be centered exactly. But it is essential to have the brass tube inside the blank to make it possible to fit the parts in during the next step.
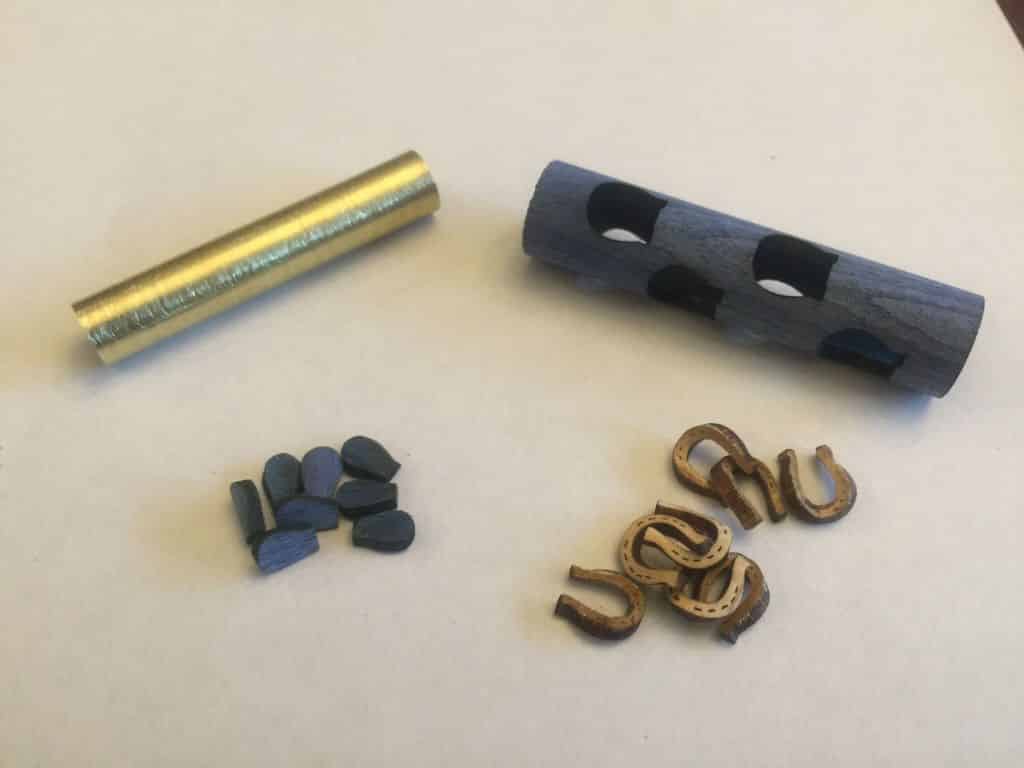
Horseshoe Pen Kit Parts
The horseshoes are loose in the kit and have been laser cut from olivewood. The nail marks are already present, having been burned into the laser-cut parts. Once the horseshoes are positioned, the center of the horseshoe is filled in with small pieces of more blue-dyed boxwood. The fit is pretty decent, but the laser-cut parts can still fall out. To secure them, again following directions, I wrapped small rubber bands, provided with the kit, around the inserted components to hold them in place.

Horseshoe Pen Kit Assembled and Rubber Banded
Gluing Up the Assembled Blank
Next, I tore off a piece of waxed paper, set the rubber-banded blank on it, and proceeded to coat the entire blank in thin-consistency cyanoacrylate glue. The thin-consistency glue seeped in around all the small laser-cut parts, adhering everything to the brass tube inside. I had to carefully make sure that the brass tube was centered as nearly in the middle as possible before gluing it all together.
I could have chosen to use an accelerator to quick cure the cyanoacrylate, but I wasn’t in a hurry and besides the accelerator can cause the glue to foam, thicken, and turn white. I was concerned that the foaming might mar the appearance or might cause the small parts to pop out of place, so I simply put the blank aside and let it cure overnight.
Rubber Bands Adhered Forever
The next day I attempted to remove the rubber bands. I had left them in place because some of the small parts would fall out when the blank was moved. I guess I thought that since cyanoacrylate doesn’t adhere to wax that it wouldn’t adhere to natural rubber. Well, it adheres to rubber just fine. I was able to carefully cut most of the rubber bands off but there was a good deal of residue left. I wasn’t too concerned as I thought I would probably be able to just turn the rubber residue off during the turning process. The residue came off easily as I had expected and hoped. You’d never know the rubber bands were there.
Inventing a Way to True the Ends of the Blank
But before I could turn the piece, I had to true off the ends of the blank, which was cut about ¼ inch longer than necessary. Without truing the ends, the pen components wouldn’t fit. The instructions were clear that under no circumstances should a standard pen mill be used for truing the ends. Instead they recommended sanding the blank to size. Now, long ago, I had a belt sander that was intended to perform tasks such as this. It was an unmitigated disaster because I found it impossible to ensure strictly 90 degree ends on a sander in the way that I have seen demonstrated and that seemed to be implied in the instructions. I suppose I could have just rubbed the blank against a piece of sandpaper on the benchtop but that seemed likely to take a long time with no guarantee of success. Instead, I devised my own solution which proved to work brilliantly.
I have a pen drilling jaw set, given to me by my Dad, for use with a Teknatool Nova Chuck. I set this up on the lathe and carefully closed the jaws around the glued up blank. I set the tool rest as close as possible to the end of the blank protruding from the jaws. With the lathe running at a low speed, I used the square head carbide cutter loaded in my Easy Pen Turner tool from Easy Wood Tools to carefully shave very small pieces off the blank until I was right up to the brass, using the side of the square cutter to very accurately square off the ends of the blank. I repeated the process for the other end of the blank. I firmly believe this method was much more accurate and effective than any sander ever could have been.
Turn and Finish
Now, all that remained was to mount the blank on the lathe with the bushings and turn it to size. I was nervous that my tool would catch in one of the laser-cut pieces and destroy the entire blank, but by being very delicate and careful with my cuts I was able to easily and quickly turn the blank to size.
I decided to use a friction finish, which was recommended in the instructions, although they also noted that you could use a cyanoacrylate finish as well. I considered that and I have used cyanoacrylate finishes before on pens, but I don’t care for the plastic feel and look that such a finish imparts. I like a wood pen that looks, and feels, like wood.
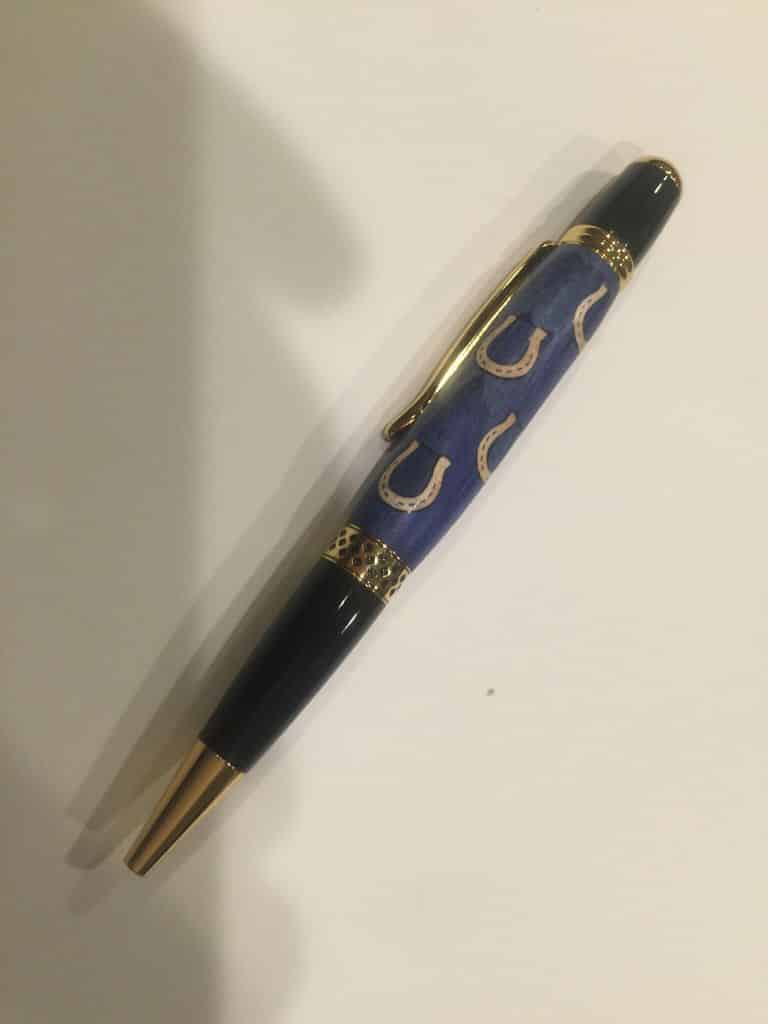
Completed Laser Cut Horseshoe Pen
Parting Thoughts
Overall, I am very pleased with the results. The laser-cut blank and parts combine to create a truly unique and remarkable pen that is sure to attract attention and hopefully admiration in all who use or see it. I am now eager to try working with other laser-cut blanks now that I have moved past my fear and apprehension around working with them, having met with success in this initial attempt. I would readily encourage all pen makers and other wood turners, especially those with a bit of experience in more routine pen making and general wood turning procedures, to give these laser-cut pen blank kits a try as soon as possible.
As always, I wish all my readers a great experience in whatever their wood working interests happen to be and to those who like working with lathes especially, do a good turn today!
very nicely done and well described process Andy