Introduction and Rationale
In a previous post, I wrote about many of the general characteristics of working with Corian as a pen making material. That post came about as a result of a project in which I decided to make a batch of 36 pens using Corian blanks and Slimline pen kits from two vendors: Woodcraft and Craft Supply USA. The kits were essentially identical, although there was an extremely slight difference in the length of the brass tubes. This difference had no effect in the assembly of the pens however as the blanks were mixed by accident although I had kept the blanks for each manufacturer separate initially. So goes one of the risks of a shared shop space. My motive in making this batch of pens was simply to use the kits. I had purchased them years before and as I had the kits and I had the Corian I went with it. I don’t have any more Slimline pen kits but I still have a great deal of Corian, so mission partially accomplished. In what will be a series of 9 consecutive posts, I intend to discuss in detail each discrete step in the process of making this batch of Corian pens. I hope you enjoy this in-depth look at the pen making process in general, and the use of Corian as a material in specific.
Mandrels
Now comes the fun part, actually turning the blanks down to round, then to a shape you like while achieving the required size for the pen kit to work. One essential piece of equipment you must have for making pens, in addition to the lathe of course, is a pen making mandrel. Not a country singer, the mandrel in this case is what will hold the blanks as you proceed with turning them. There are multiple different mandrels on the market intended for pen making and I have used several of them over the years. My first mandrel mounted into a live center on the tail stock but the problem I quickly encountered with this method was mandrel distortion. As the necessary pressure would be applied to the blanks and bushings on the mandrel, the mandrel would bend. Once a mandrel is bent, even slightly, its usefulness is gone; it must be replaced. After much trial and error, I found the mandrel I use to this day. Instead of pressure being applied to the mandrel itself, the mandrel runs through a specially designed tail stock mounted piece which applies the required pressure to the blanks and bushings while sparing the mandrel. Sadly, I no longer know where I found this mandrel and hope I never have to replace it.

Pen Makers Mandrel
Bushings
I referred to bushings above and if you don’t know what they are, you soon will. Bushings are small, usually metal, pieces that slide onto your mandrel before and after each blank. The purpose of the bushings is to indicate to you as you turn the finished size of the blank. Your blank, when finished, should be the same thickness as the mandrel. Depending on the kit, the bushings may be the same size or they may be different sizes. If the sizes are different, it is very important to place them in the correct order on the mandrel to ensure that your finished blank will work with the chosen pen kit hardware. Instructions are always provided with every kit, or are available on-line or on request. Until you gain a great deal of experience with any one kit, ALWAYS refer to the instructions! To this day, even though I have successfully made hundreds of pens, I still double check my process against the instructions. With every pen kit you purchase, you must also purchase the requisite set of bushings. The vendor will always tell you which bushing set to buy. Fortunately, you can, with some care, reuse bushings over and over again, but if you use them a great deal, eventually you will need to replace them. The reason for replacing them is because no matter how careful you are and no matter what an expert turner you are, you will inevitably hit the bushings with your lathe tool and wear them down from the original and required size.
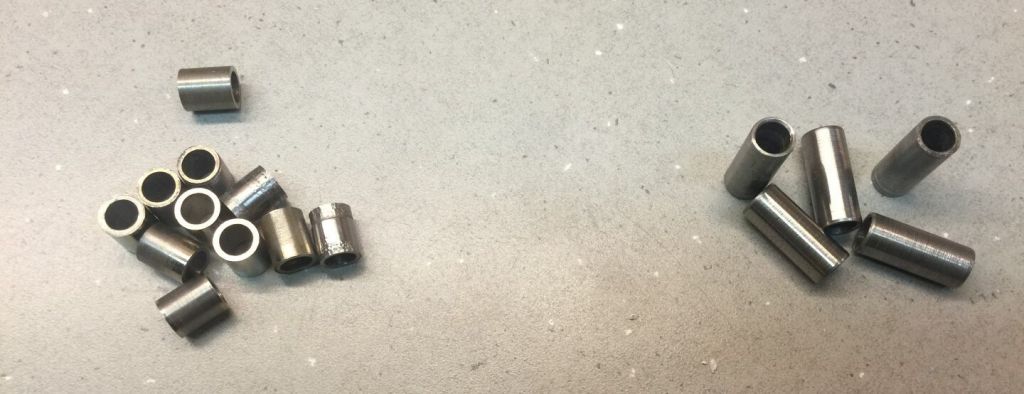
Bushings for Slimline Pens
Out with the Mandrels, Bring In the Calipers
Some very experienced, and persnickety, pen turners will discard the bushings because of the fact that they can become worn down, or because some pen turners don’t trust the bushings to be accurate enough for their need for absolute self-assesses perfection. Sometimes I think some authors of articles in wood turning magazines like to make themselves sound important, expert-like, omniscient, or they just enjoy setting impossible standards that even they themselves don’t, and can’t, live up to. Whatever the reason, these pen turners measure each component of the kit with calipers to get EXACT thicknesses and then use those calipers to measure the thickness of their blanks as they turn them to achieve an exact match within micrometers, at least to hear them tell it. I rely on the bushings, I replace them when they become visibly worn, and I have made many quite beautiful and functional pens using this process and method. So there.
Mount the Blanks
The blanks, usually two at a time if mandrel space permits, are mounted on the mandrel. First a bushing is slid on, then the blank is mounted against, or actually on, the bushing, depending on the model, then the second bushing is placed. Repeat for two blanks. The tail stock is tightened and the blanks are ready to turn.
Pen Turning Tools
There are literally dozens of turning tools out there on the market and most any of them will work just fine for the purpose of turning pen blanks. You can spend hundreds of dollars on turning tools and I have also heard of turners who have made their own turning tools out of old screwdrivers and such. I have experimented with more than my fair share of turning tools and I have come down firmly in favor of the products of Easy Wood Tools. I find the tools truly easy to use, requiring minimal practice to master, very much unlike traditional turning gouges and skew chisels. Easy Wood Tools never require sharpening because they utilize replaceable carbide cutters that last for long periods and are easy to rotate and ultimately toss and replace. Easy Wood Tools come in variety of sizes and shapes to match every need and skill level. Easy Wood Tools even has a tool specifically intended for pen making although I don’t notice significant difference between it and the small size Easy Rougher.
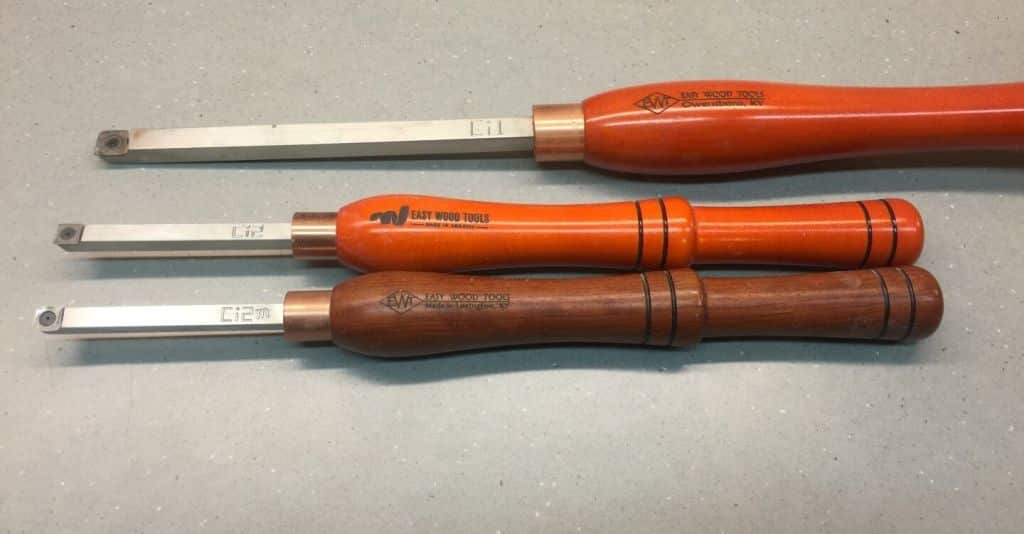
Easy Wood Turning Tools – Note Size Differences
My Tool Choices for Pen Turning
For pen turning, I use the small size Easy Wood Tools Easy Rougher for the entire process. I have two of these tools; one mounted with a cutter that is slightly convex and one that is perfectly square. The square cutter gives very reliable straight sides and then I can use the convex cutter to give the final slightly curved shapes I prefer for pens. Alternatively, I can just use the convex cutter for the whole process from start to finish. The Easy Wood Tools Rougher, with both cutters installed, performed beautifully with the Corian, cutting all 72 of the blanks without ever requiring turning the cutter head or replacement.
Proceed Normally
Turning the Corian didn’t require anything different in terms of technique or style than I would use with wood pen blanks. If anything, I find turning the Corian to be easier than turning most woods. The Corian invariably cut cleanly and smoothly. Some of the blanks, especially those of darker coloration, would appear hazy or milky after cutting, but this was quite easily removed with minimal sanding and the polishing at the end completed the transformation from haziness into brilliant shine and gleam.
Sanding, Who Needs to Sand?
I have read wood turners who claim that their turning techniques are so amazing that either they never need to sand or if they have to stoop to such an undignified practice, then they never start with a grit any lower than 320, or maybe they might have to sink to as low as 220, but that is the absolute roughest grit they ever need, because you see, they are practically wood turning deities. Yeah, right. I do believe that some wood turners who write articles for publication have quite impressive egos, and they might even be good turners too. But I would give a tooth or two to really see what goes on in Lyle’s shop.
Anyhow, when using the Corian, I was pleased to find that it really was true that I never needed to sand with anything lower than 220. With acrylics this is quite realistic if you have even moderate turning skills. I have never achieved this with wood of any species, but with Corian it truly was possible. Honest!
Easy to Turn
The Corian turned so easily, in part, because there never was a great deal of material to remove in the first place given the very small starting size of the blanks. Also, while Corian is ultimately an acrylic product of some variation, it cuts much more cleanly and is a great deal less brittle than any other acrylic product I have ever worked with. Turning Corian, and lots of it, was really a pleasure.

Finished Blanks Racked Up for Assembly
Ready for the Next Step
To keep my finished blanks neat and organized, I made a small rack with small dowels that will hold the blanks upright. This is very helpful when making a lot of pens using lots of different woods. Using the grid system marked on the rack, I can keep accurate notations that tell me which blank is which wood when the blank is finished. Most likely, the species of the wood was written on the unturned blank, but of course this information is gone once the blanks are turned. The turned blanks fit nicely on the rack awaiting assembly, the topic of a future installment in this series.