Introduction and Rationale
In a previous post, I wrote about many of the general characteristics of working with Corian as a pen making material. That post came about as a result of a project in which I decided to make a batch of 36 pens using Corian blanks and Slimline pen kits from two vendors: Woodcraft and Craft Supply USA. The kits were essentially identical, although there was an extremely slight difference in the length of the brass tubes. This difference had no effect in the assembly of the pens however as the blanks were mixed by accident although I had kept the blanks for each manufacturer separate initially. So goes one of the risks of a shared shop space. My motive in making this batch of pens was simply to use the kits. I had purchased them years before and as I had the kits and I had the Corian I went with it. I don’t have any more Slimline pen kits but I still have a great deal of Corian, so mission partially accomplished. In what will be a series of 9 consecutive posts, I intend to discuss in detail each discrete step in the process of making this batch of Corian pens. I hope you enjoy this in-depth look at the pen making process in general, and the use of Corian as a material in specific.
Finish Sanding
I noted in the previous post that I achieve great results with the turning tools I use to turn the Corian and that only minimal sanding is required. While that is absolutely true, I do still do some finish sanding to ensure that I have the highest gloss finish possible. I have never had to start with anything lower than 220 grit and even that is probably harsher than I require. I follow that with 320, 400, 600, and finally 800 in traditional paper disc formats. I am a bit obsessive about the final sanding finish and these are the grits I work down to with any and all wood projects, pens and bowls included, as well.
Micro-Sanding
With plastics, I go a good deal further to ensure a high gloss finish and an excellent hand feel. I use a 9 grade micro-polish system as well. I have micro-sanding equipment in two formats: pads and small cloths that can be used with a larger pad. For the pens, I use the pad system, which is color-coded for clarity should the pads get out of order. The pads progress from 1,500 grit down to 12,000 grit for the final polish sanding. As you would expect, these grits are very fine and you can’t really feel much past the first pad, but I do notice a difference as I work my way through them all. There are several variants on the market, produced by different manufacturers. One system that I have employs half the number of pads by placing different grits on each side, but I personally find that more confusing and you have half as much micro-sanding capability in the end anyway. I don’t use the sheets with pen making because I find it that the sheets grab on to the blank quite easily.
Wet Sanding
You can use the micro-sanding pads or sheets with water for a wet sanding as well, and some who work extensively with acrylics recommend this. I have not noticed that I achieve a greater finish when wet sanding, so I don’t mess with it anymore. If you do elect to use wet sanding, be absolutely certain that you thoroughly dry all lathe, or other tool, surfaces that might have come into contact with water. I once had my entire band saw table turn rust-red just from the high humidity in the air where I live. Tool surface, including lathe beds, are not rust-proof and any moisture can ruin them. I wipe up all water spills immediately and then I follow that with an application of a commercial tool saver spray that lubricates and removes any traces of moisture or rust. You can also use acetone for a wipe down as the acetone, readily available by the gallon cheaply in any paint supply store or section of a larger home improvement or hardware store, will evaporate very quickly. This acetone method is often used in laboratory glassware cleaning where all traces of water must be removed.
Once I have run through all the grades of micro-sanding pads, I am ready for the final preparation step, polishing.
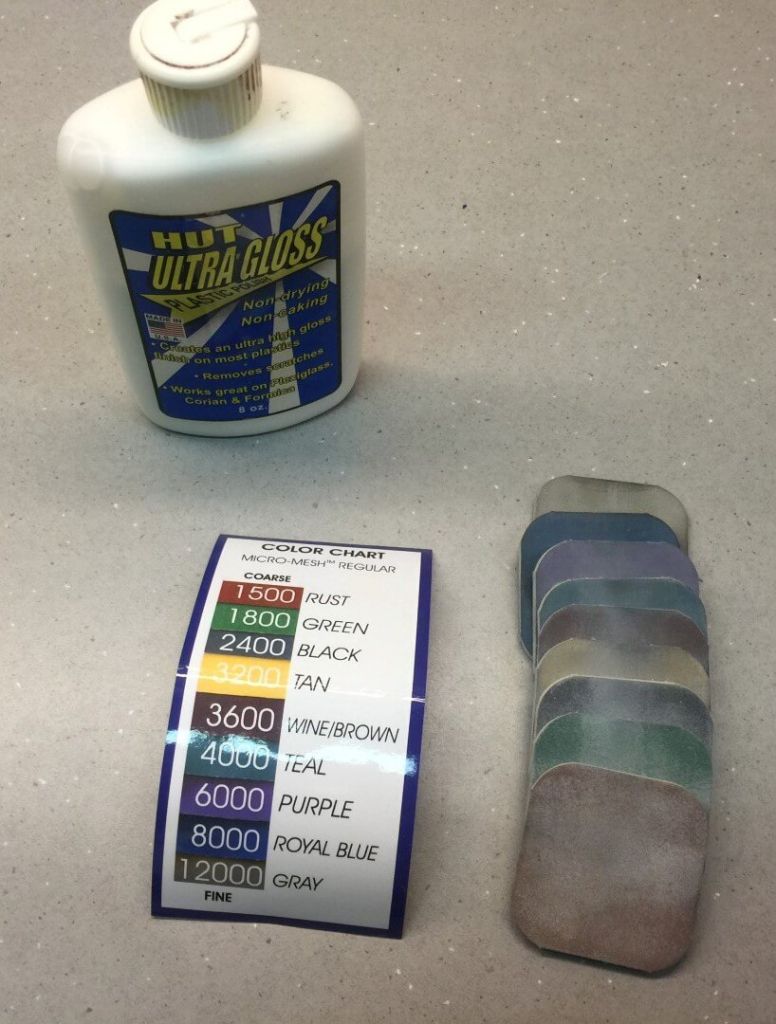
Corian Polishing Supplies
Polish vs Finish
Most everyone who turns anything on the lathe, or who works with wood in general, is familiar with finishing methods to some degree. There are dozens of finishing methods and everyone has their favorites for use in different situations with different woods. But, when working with an acrylic or other non-wood material, i.e. bone, antler, metallic, stone, etc. the turner doesn’t use a finish but instead a polishing compound. There are several polishing compounds on the market and I have used several difference varieties. I do use a specialty compound when polishing metallic blanks but for acrylic and other plastics, including Corian, and I am quite pleased with HUT Ultra Gloss Plastic Polish. Craftics 20/20 Plasti-Polish is a slightly cheaper alternative but it produces more of a satin or matte finish whereas I like the glass-like finish provided by the HUT Ultra Gloss Plastic Polish. HUT manufactures other easy to use and effective finishing products as well, and I have used them all, and continue to do so in many situations, with great satisfaction.
Using the Plastic Polish
HUT Ultra Gloss Plastic Polish couldn’t be easier to use. Simply apply a SMALL amount (the plastic cannot absorb a finish as wood can, so any excess will simply spray all over your shop) to a clean dry cloth. Hold the dampen cloth firmly against the blank as it spins on the lathe, with the RPM run up to a polishing speed of 2,000-3,000 RPM (much easier to do is you have an electronic speed setting on your lathe as I do with my Laguna model), and be sure to cover all of the area of the blank. If you come into contact with the bushings you are likely to have a black residue on your polishing cloth from where the metal has been polished. Don’t worry, the discoloration will not transfer to your blanks. The polish contains micro-abrasives that give the Corian, or other material, an excellent shine and no drying time is required. Just be certain to polish off the blanks with a dry cloth, or dry area on your polish cloth. I rub mine once I take them off the lathe, sometimes just on my t-shirt if I am to be completely honest, and then place them on the rack to await assembly. I will detail the assembly process in the next post in this series.