In a previous post, I wrote about many of the general characteristics of working with Corian as a pen making material. That post came about as a result of a project in which I decided to make a batch of 36 pens using Corian blanks and Slimline pen kits from two vendors: Woodcraft and Craft Supply USA. The kits were essentially identical, although there was an extremely slight difference in the length of the brass tubes. This difference had no effect in the assembly of the pens however as the blanks were mixed by accident although I had kept the blanks for each manufacturer separate initially. So goes one of the risks of a shared shop space. My motive in making this batch of pens was simply to use the kits. I had purchased them years before and as I had the kits and I had the Corian I went with it. I don’t have any more Slimline pen kits but I still have a great deal of Corian, so mission partially accomplished. In what will be a series of 9 consecutive posts, I intend to discuss in detail each discrete step in the process of making this batch of Corian pens. I hope you enjoy this in-depth look at the pen making process in general, and the use of Corian as a material in specific.
Brass Preparation – Required or Not?
From the very first instruction on pen making that I received from my father, right through to the most recently consulted directions sent with a pen kit, I have been told that prior to gluing the brass tubes that come with every pen kit into the drilled blanks, I must scuff the brass with sandpaper first. I have read this advice from dozens of sources but I have also read from others that it isn’t necessary because the brass will bond just fine with the commonly used pen making adhesives of cyanoacrylate (Super Glue®) or multiple step epoxies. So, I wondered who is correct and why did the practice of brass scuffing arise?
Some Historical Background
I can’t say who originated the practice of scuffing the brass before gluing but it is a widespread one. The most reasonably theory as to why this is important has to do with some basic chemistry about brass and its reaction to air. Brass is a very useful and ancient alloy of the metallic elements copper and zinc. Brass has been made and used since antiquity, in fact, even before metallurgists understood what brass was made of. Copper was known but zinc as a distinct metal wasn’t until into the 18th and 19th centuries, so the initial creation of brass was accidental due to zinc “contamination” of copper ores. Brass is relatively soft and easy to work and it is fairly cheap as well, although as the price of copper rises, so will the cost of brass.
What Brass Is, Chemically, and Its Reactions
Because it is an alloy of copper and zinc, the chemistry and reactions of those metals will affect brass. The issue being addressed with the scuffing of brass tubes before gluing is the oxidation, the reaction of oxygen, and to some limited extent, sulfur, gases that are always present in the atmosphere with the copper and zinc that make up brass. Copper oxidizes much more easily than does zinc with both oxygen and sulfur. Just to be annoyingly clear about this, an “oxidation” reaction doesn’t require the presence or involvement of oxygen. Rather, it is a chemical term that means that the electrical charge on a metal atom increases, in these cases from a charge of zero to +2 or +3. Both oxygen and sulfur are capable of entering into such reactions with copper but it is mostly oxygen that is involved with zinc. The oxygen in the reaction is “reduced,” meaning that its electrical charge is lowered from 0 to -2. The atom that is reduced or oxidized now exists as an ion, a charged particle found only in combination with another oppositely charged ion, or dissolved into solution. There is no such thing as a visible pile of copper ions, only the compound or solution in which those ions are bound up. The atom which is reduced is said to be the oxidizing agent and the atom which is oxidized is said to be the reducing agent. So, copper and zinc which are oxidized are reducing agents, and the oxygen which is reduced is said to be the oxidizing agent. Only in the last case is this obvious but chemistry frequently is obscure to the uninitiated. My thanks to Herb Forester who patiently instructed me in these matters involving matter long, long ago, back in 1987.
Passivation
These oxides of copper and zinc, and the sulfides of copper (think the green stuff on the Statue of Liberty, otherwise known as verdigris; that is copper oxidized with sulfur mostly, and some oxygen) coat the surface of the brass. Because they are relatively stable and impervious, they “passify” the brass and prevent any further degradation or chemical change, unlike oxidized iron, changed to iron oxide, otherwise known as rust, which flakes off exposing more iron to be oxidized, and so on until the iron is all changed from elemental iron to ions bound up in the oxides. Some people feel that these oxides could interfere with the bonding action of the adhesives between the brass and the blank material, wood, plastic, bone, etc, and therefore should be removed with sandpaper immediately prior to gluing.
Rough Is Tough
Another explanation for the need for brass burnishing is to create a rougher surface to better increase the bonding action between the brass and the blank material. In this theory, the scratches created in the brass give the adhesive something to adhere to, strengthening the bond.
Results of Trials
I’ve read reviews by pen makers who have tried burnishing and not burnishing in which the adhesion results were the same: excellent. Modern adhesives can bond most anything, even oxides or sulfides, and even two smooth surfaces. Regardless, because it was the way I was taught I continue to engage in the practice of burnishing.
My Method for Burnishing Brass
The method I use depends on how many brass tubes I need to burnish. If I am only handling a couple of tubes, I simply hold a piece of sandpaper, say about 80-120 grit, it doesn’t matter specifically I don’t think, and rub the brass tube up and down in it. It takes seconds to do. However, if I am handling a large number of tubes, say 72 of them, then I mount them on the lathe mandrel, with bushings to hold them in place, turn on the lathe, and use the same paper but the power of the lathe motor instead of my hands to move the brass. I do this because I have severe problems with grip strength due to neuropathy in my hands, therefore, hand burnishing a large number of brass tubes would be painful and ultimately impractical. The process when using the lathe is very fast and very consistent.
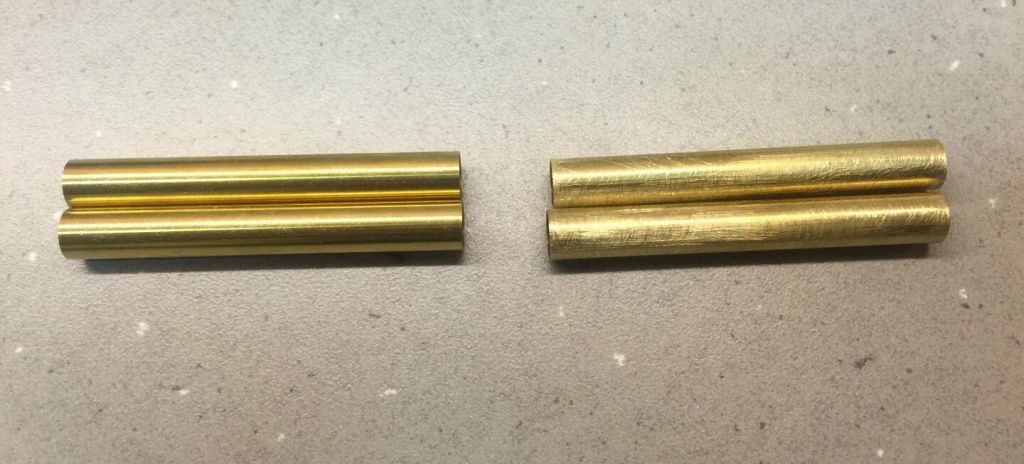
Brass Not Burnished on Left, Burnished on Right
It is important to not overdue the burnishing of course. You mustn’t compromise the size of the tubes because then they won’t fit in the bore you have drilled and the pen will fail. All that needs to be accomplished is a very light sanding lasting seconds only. The brass will noticeably brighten and appear polished. When you see that you are done and the brass is ready to be glued.
Moving On, Quickly Now
It is important to note that because you have removed the passivation layer from the brass that the passivation process will start immediately now that fresh metal is exposed to the oxygen and sulfur in the air. Once the brass is burnished, you should quickly move on to the next step, the gluing of the brass into the tubes. Burnished brass cannot be stored overnight, much less longer, without the need to repeat the process. Only burnish immediately before you are ready to glue, the step in the process we will take up in the next post to follow this one.